"I can't burn a DVD since upgrading to Windows 10. When I try using Windows Media Player, it says to connect to a burner and try again. Why can't I burn a disc and should I have to get a new burner?"
Windows DVD Maker is no longer available on Windows 10, which produces a hard task to burn a DVD disc on Windows 10. "Can't burn DVD on Windows 10" problem involves people who want to copy digital files to DVD disc into trouble. How to fix this DVD burning problem to make a DVD copy from any video file on Windows 10 correctly? Follow us!
Windows 10 Still Give Options for DVD Burning? Not Exactly!
Windows Media Player for Windows 10 features a CD/DVD burning function allowing users to burn items (music, photos, video clips) in Player Library to disc. Open the help page and we can get a detailed explanation of how to burn disc using WMP on Windows 10.
Some people successfully burn disc via DVD drive with Windows File Explorer.
• Insert a black readable disc into DVD drive.
• Open File Explore and find the DVD drive (for example drive G:)
• "Burn a Disc" window pops up. Enter disc title and select how I want to use the disc, like a USB flash drive or like a CD/DVD Player. Click next and a temporary folder named "Files ready to be written to disc (1)" storing one file desktop.ini will appear in drive G:.
• Now, drag files you want to burn to disc to this temporary folder in drive G:.
• Select "Manage" menu and click "Finish burning" button.
• Follow the wizard to set disc title, recording speed, disc format (CD or data DVD) to finish DVD burning.
As a matter of fact, the above two methods are only able to burn files to data DVD which can be readable and writable on computer but cannot play in a DVD player. Therefore, we still can’t burn a movie/video to DVD on Windows 10 available for DVD player.
How to Fix "Can't Burn DVD on Windows 10" Problem
To escape from "Windows 10 won't burn DVD" trouble for copying any files to a disc playable on PC and in DVD player, it is strongly suggested to get help form 3-rd party DVD burning software.
WinX DVD Author is a high-rated DVD burner for Windows (10/8.1/8/7/Vista/XP). It boasts to convert videos in virtually all mainstream formats (H.265/H.264, MKV, AVI, WMV, MOV, MTS, FLV etc.) as well as ISO image to NTSC/PAL DVD. Customizations are available as well. We can optionally make DVD menu/chapter, insert SRT subtitles, set background music/image and change aspect ratio as 16:9 or 4:3 for widescreen or standard TV. With powerful decoder and encoder engine, it delivers a super fast DVD burning speed, about 1 hour to make a full 4.3G high quality DVD. Supported DVD formats include DVD+/-R, DVD+/-RW, DVD DL+R and DVD DL+/-RW. In addition, it is totally free and safe bundled no malicious software and virus.
How to Burn a DVD on Windows 10 with WinX DVD Author
Step 1. Download and Install WinX DVD Author
 Download WinX DVD Author to your Windows 10 PC. After the .exe file is downloaded, double click it to install this Windows 10 DVD burner following the wizard.
Download WinX DVD Author to your Windows 10 PC. After the .exe file is downloaded, double click it to install this Windows 10 DVD burner following the wizard.
Step 2. Import Burning Files
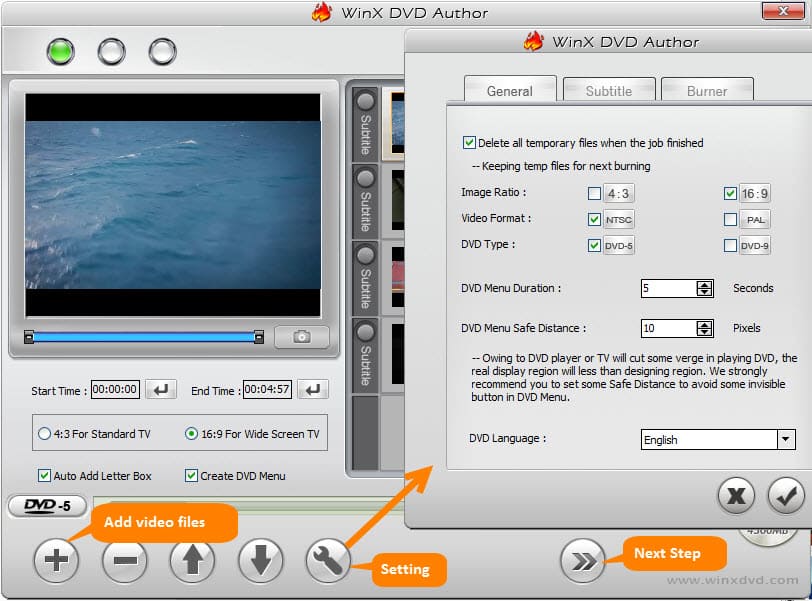
Insert a blank DVD disc into DVD drive at first. Then, open WinX DVD Author and click Video DVD Author button. Another window appears. Click + button to add video files you want to burn to DVD. Click next step button.
Insert a blank DVD disc into DVD drive at first. Then, open WinX DVD Author and click Video DVD Author button. Another window appears. Click + button to add video files you want to burn to DVD. Click next step button.
Tip: Under the preview monitor, there are some options enabling you to set start/end time and aspect ratio. Two options Auto Add Letter Box and Create DVD Menu are checked by default. You can uncheck them depending on your own needs. Also, setting gear button can lead you to access to the setting window to adjust general DVD info, add subtitles and more.
Optional. Create DVD/Chapter Menu
On the right column, you can select any of preset images as background picture for menu or add new one(s) from PC. On the right panel, you can set menu background text/music, add or delete menu button on video clips. After all settings are done, click next step button. >> Learn how to create DVD menu…
Step 3. Burn to DVD
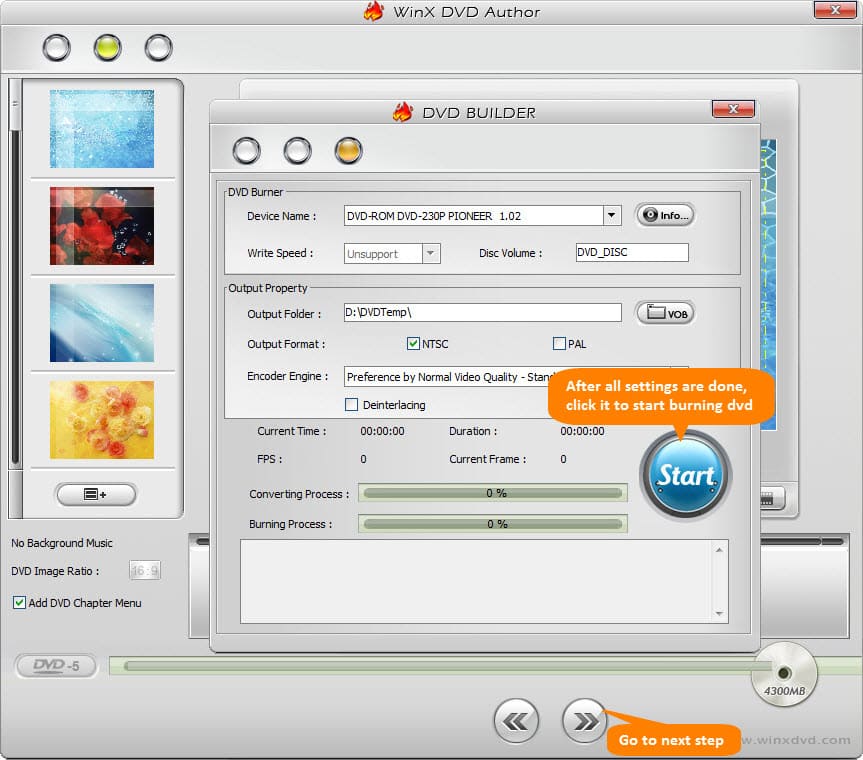
DVD Builder dialogue pops up with 3 panels, DVD Burner, Output Property and process board. DVD device info will be automatically detected and listed. Now, go to Output Folder which is sued to save temporary VOB file which is converted from imported video files and then will burn to DVD later. Select the output format as NTSC or PAL according to your region. Finally, click Start button to starting DVD burning on Windows 10.
DVD Builder dialogue pops up with 3 panels, DVD Burner, Output Property and process board. DVD device info will be automatically detected and listed. Now, go to Output Folder which is sued to save temporary VOB file which is converted from imported video files and then will burn to DVD later. Select the output format as NTSC or PAL according to your region. Finally, click Start button to starting DVD burning on Windows 10.
没有评论:
发表评论